After reading part 1 "Traffic Company: A quick overview" you should feel a bit more familiar with our platform. Now I think it's time to start setting up your first promotion with Traffic Company. You want to make money right? Let's get to it!
We'll start with what might just be the most important step:
Supply your billing details
We know you're eager to dive right in, but first of all let's make sure that we can pay you once the money starts to flow. Open your account details and provide us with all the necessary information. Some useful info regarding payouts:
- We support Paxum, Paypal and international bank transfer.
- We require a minimum amount of € 250 before we start invoicing.
- You can choose to be paid out monthly, bi-weekly or weekly (contact your Account Manager for information regarding the last option). Weekly and bi-weekly payments will be processed on Fridays, while monthly payments will be processed on the 5th day of each month.
Tip: All your invoices can be downloaded on your invoices page. You can also subscribe to receive your invoices by email in your subscription settings.
Set up a postback URL (optional)
Before your start your promotion, it's important to know that we also offer Postback / S2S tracking. This enables you to use any third party tracking platform you like. The most popular ones (AdsBridge, Voluum and TrackingDesk) are directly integrated into our platform and can be easily set up in your Postback settings.
Remember that this step is not strictly necessary, since we offer all the necessary tools in our Reports page for you to view and analyze your results. If you want to learn more about why you would need to use a postback URL, I recommend you to read Hendrik Jan's post called "Getting Familiar with Postback-tracking".
Create a promotion URL
So now everything is set up you're ready to start promoting! Luckily this part is super easy since our Smart Link takes care of all the hard work.
Promoting with a Smart Link
Start by opening Promotions > Smart Link from your dashboard. You will be presented with a simple form.
First we need to know what kind of traffic you will be sending us. Since our system actually uses this information to find the best offer for your traffic, we recommend you to always select the right source type. If you don't know the source type, or if your traffic contains a mix of source types you can select "Other".
Next select the type of content you want, mainstream or adult. When you select mainstream, only mainstream offers will be included in your Smart Link. When you select adult, both adult offers and mainstream offers that allow adult traffic will be included.
Enter a promo info keyword to keep track of your promotions, but please note that this should not be used to track individual visitors. Promo info's can be viewed in your live stats and reports and can also be sent with your postback URL.
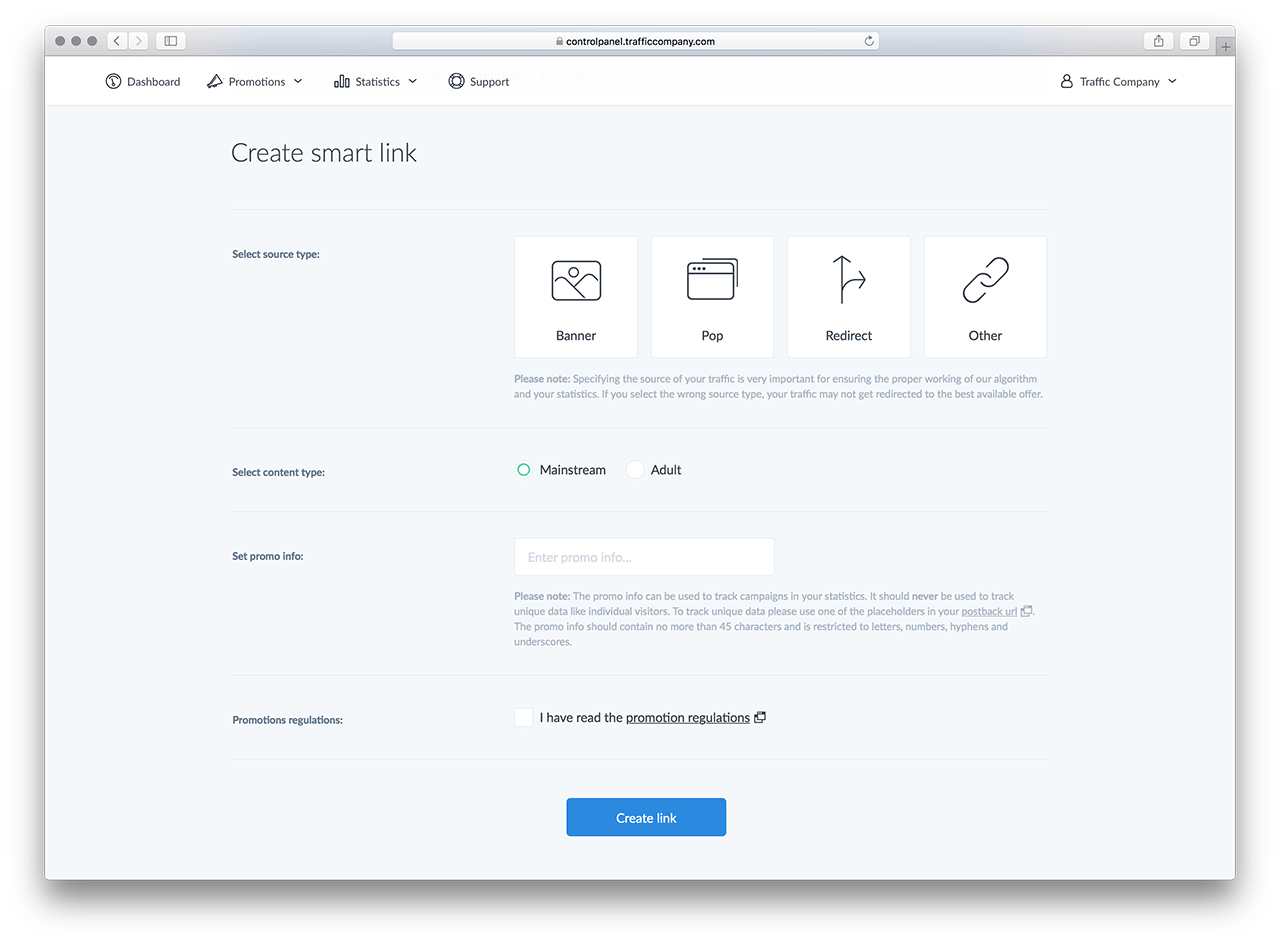
When you've read and agreed to our promotion regulations, press the big blue button saying "Create Link" and a pop-up will open where you can find:
- Smart URL
Your unique promotion URL. - Smart Banner / Pop-under / Redirect
Integrate your Smart Link directly into your website. - Facebook URL
The same as the smart URL, but specifically for Facebook campaigns. - Unmoderated URL
Be careful! This link includes unmoderated offers that may contain malware, JavaScript alerts, auto-downloads etc.
The great thing about the Smart Link is that it is ready to receive any type of traffic, regardless of country, carrier, operating system, device etc. Our powerful algorithm will analyze each visitor and send it to the best converting offer available. Easy as pie!
Promoting with a Direct Link using the Offer Wall
As explained in Static Links v.s. Smart Links some people prefer promoting single offers. That's why Traffic Company has recently launched a new feature called the Offer Wall, built especially for all promoters that want to take full control of their promotions.
Start by opening the Offer Wall by going to Promotions > Offer Wall. You will be greeted by a list of our top converting offers. This list is constantly being updated with new offers, so be sure to check back often!
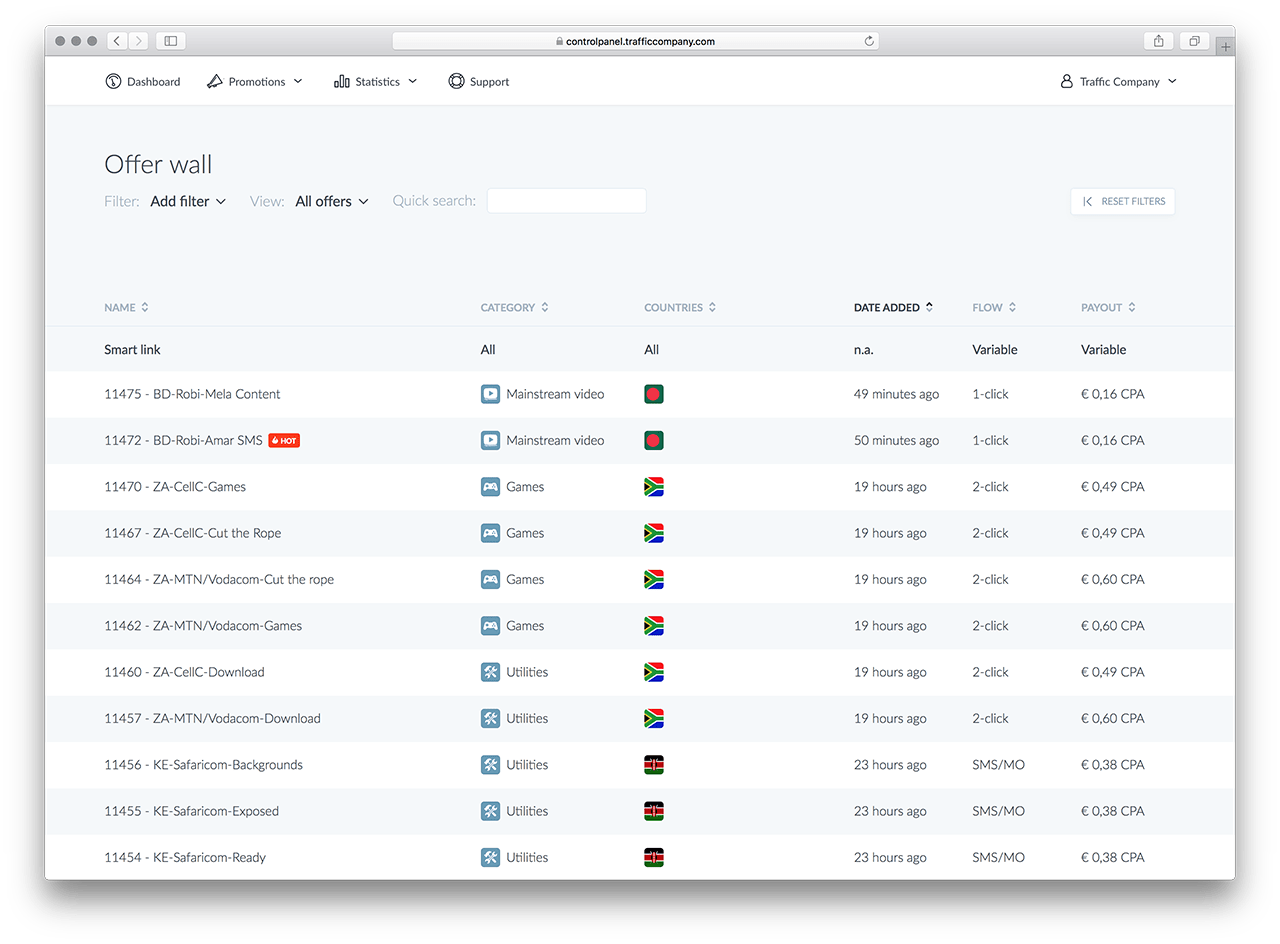
Use filters to find the offers that work with your traffic and open the offer you want to promote. You will be taken to the detail page where you can view additional information about this offer. Here you can create a Direct Link much like how you would create a Smart Link (as described above), the only difference being that the generated link will always open the offer that you've selected.
Check your stats
Once you start sending traffic to your promotion URL you will immediately see it appear in your Live Stats. Notice how our system scans and tags each individual visitor by country, carrier, device etc. When you see traffic coming in here, you are probably already making some good money! To fully analyze and optimize your promotions, open the Reports page where you can view all your visits, sales, conversions and revenue. Use various filters to view specific sets of data and change the view settings to group by date, country, carrier, offer etc. Learn to use these tools since they can be very powerful!
Wrapping up
This is all there is to it, from here it's just rinse and repeat! We honestly think that making money cannot get much easier. And remember; if any part of this post is still unclear to you, just shoot me a message or add me on Skype and I will personally walk you through the process.